

Restringing a guitar is a good, basic skill that experienced guitarists can benefit from learning.
Especially if you are on the road with your electric guitar or don’t have a local music store to run to, you’ll want to learn how to restring your own guitar.
On the whole, the strings on an electric guitar will need to be changed more frequently than the strings of steel-string or classic guitars, depending on usage and bridges.
While serious players will likely change their strings monthly, or sooner, most players should change strings every 3-4 months.
Changing strings on your electric guitar should be a straightforward process, though it does take some practice.
Here are some easy steps to follow when you change your electric guitar’s strings.
Contents
- 1 What should you know before restringing an electric guitar?
- 2 Things to consider when buying new strings
- 3 Different styles of electric guitar bridges and how to restring them
- 3.1 Les Paul Bridge
- 3.2 Classic Fender Bridge
- 3.3 Floyd Rose Bridge
- 3.4 Step 1
- 3.5 Step 2
- 3.6 Step 3
- 3.7 Step 4
- 3.8 Step 5
- 3.9 Signs that new strings are needed
- 3.10 Guitar Compressor Pedals – Top 12 Best Compressor Pedals for Guitar
- 3.11 How often should you change your electric guitar strings?
- 3.12 Guitar string maintenance tips
What should you know before restringing an electric guitar?
You need to change your strings if they are rusty, falling out of tune quickly or gummy.
Professional guitar players change their strings frequently.
Some professionals restring their guitar on a weekly basis, others will wait a bit longer.
Also, if you’re playing somewhere important or have a big concert, changing the strings the morning before you actually play. This will ensure that your guitar has the best possible sound.
Before removing the strings, note the path that they have.
If you are attempting to restring your guitar for the first time, take a picture before removing the old strings, so you know how everything should look.
Some guitars have special winding patterns or holes through which the strings have to go through, so it’s important to pay attention to those details.
Don’t just cut the strings off of the guitar, unless you have no other alternative. Instead, turn the tuning machine so that the string gets loosened.
Loosen the string in this manner until you can pull the string out by hand.
Remember, when stretched and in-tune, guitar strings are under a decent amount of tension, releasing them slowly is safer for you and your guitar.
Electric guitarists need to change their strings more often than do acoustic guitarists.
Because of this, electric guitars are built with hardware that makes the process of changing strings very quick and easy.
Of the three types of guitars — steel-string acoustic, classical, and electric — you can change the strings on electric guitars most easily by far.
Tools
- Fresh New Strings — preferably the same gauge as those currently on the guitar. Changing gauges will require minor set-up work beyond the scope of this article.
- Peg Winder
- Decent string or wire cutters.
- Tuner
- Stumpy Flat-Head Screwdriver — some guitars, such as PRSs with their locking tuners, may require additional tools.
- Workbench, Neck Rest, and Guitar Pad —a padded workbench with a neck support makes it much easier and faster to change strings. If the guitar is in your lap, make sure to keep it flat so nothing falls out of the bridge of the guitar when a string is off.
Things to consider when buying new strings

You might have one of the best electric guitars available, some highly-appreciated effects pedals, or amp, yet if you don’t have the right strings for your instrument and technique, all those items won’t help you much.
The strings are the only things between you, your guitar, and the sounds produced. Neglecting your strings or buying poor quality strings can be a huge mistake.
To make sure you get the right strings for your needs, you need to consider the music genre you want to play, your playing style, how often you play, and the tone and sound you want to achieve.
You should thus consider the string gauge or thickness, the materials, the winding method used for strings, and the use or lack of coatings. All these factors will impact the sonic output.
The market offers light, medium, thick, and hybrid strings as far as the gauge is concerned.
Thicker guitar strings are used for lower notes and will thus help you produce bass frequencies. Thinner gauge strings will help you with higher frequencies.
There are various materials used in the manufacture of electric guitars strings.
These differences will not only provide variations in the sounds they produce, but they also provide different levels of durability.
The winding method used for the strings also has a lot to say when it comes to playability and tone.
How to restring an electric guitar:
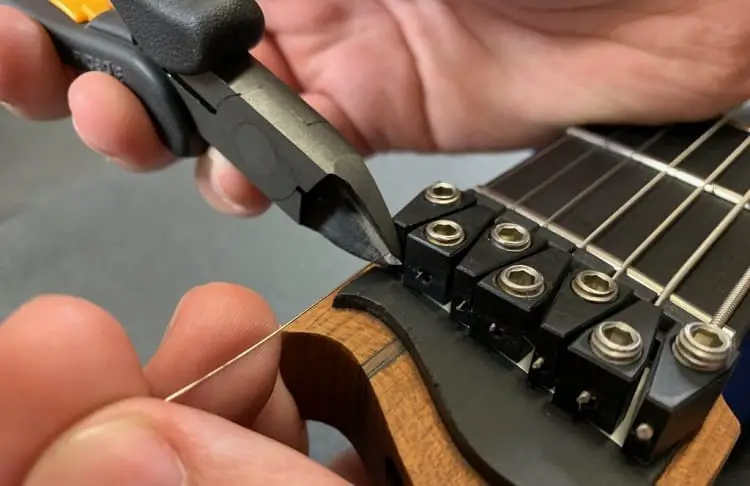
- Remove the old string. You can cut the wire and unwind it from the post, or, if you want to save it, unwind the tuning mechanism until you can remove the string. Loosen old strings with a winder to save time. If you want to save the old string, coil it up, otherwise toss it in the trash.
- Clean and Prep. What good are fresh strings if they’re about to be put on a dirty guitar? You may not notice when the strings are on, but the oils from your fingers can make the neck and fretboard greasy and dirty. Before installing new strings, gently wipe down the neck, and oil the fretboard with lemon oil.
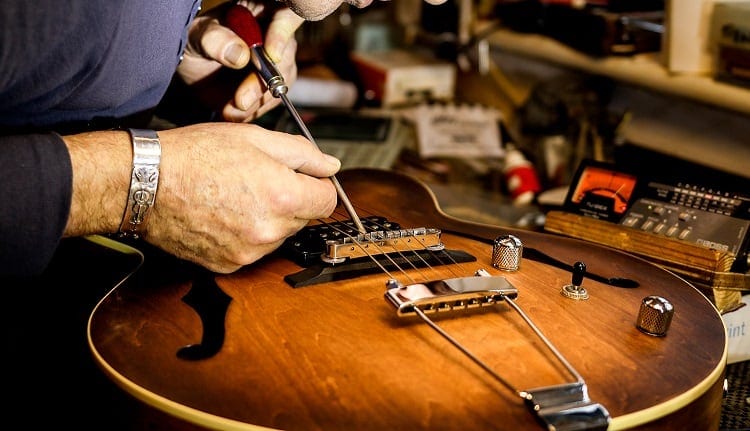
- Anchor the string at the bridge by passing the string through the hole (from the back or bottom of the guitar) until the ball stops the movement. The ball holds the string in place just like a knot at the end of a piece of thread holds a stitch in fabric.
- Pass the string through the hole in the post. Be sure that the strings go into the correct slot in the nut. Leave enough slack between the bridge pin and the tuning post, allowing you to wind the string around the post several times. Why’s that important? So that each string has the same amount of wind wrapped around and therefore the same elasticity when you do a string bends.
- Crease the metal wire toward the center of the electric guitar’s headstock. Crease the playing side of the string against the tuner hole – this marks out the length we will use. With your right hand, hold the string and present some tension – this will hold everything tight as we wind. Leave enough slack for winding.
- While keeping the string tight against the post with one hand, wind the tuning peg clockwise with the other hand. We’re beginning the wrap-lock now so wrap the loose side of the string clockwise back round the tuner and feed it under the crease you made in the string. Keep the tension with your right hand as you do this. For a left-handed tuner you’ll be wrapping counter-clockwise to follow the same logic. This can be tricky, and it can take a few tries to get it right.
- Holding tension with your right hand, bend the loose side of the string up and over the crease with your left hand. This makes a sharp hoop and is the start of our lock. Tug the loose end to give the string a good bend. Let go of the loose tail and wind away. Don’t slack tension with your right hand, otherwise your wind will be loose and sloppy. To make this process faster, use a wind assist.
- After the string is secure, cut off the excess and tune up the guitar. The string won’t hold the tuning for very long in the beginning because it’s still stretching. After you tune them up, gently stretch each string in a few places and retune. Do this three or four times and your strings will start to stay in tune.
Different styles of electric guitar bridges and how to restring them
Les Paul Bridge
A lot of times Les Paul guitars can go out of tune because of string slippage or even just bad strings. If you play your Les Paul a lot, change your strings weekly.
This keeps the strings alive and full of bounce. The only thing worse than dead strings is string buzz.
Unlike some guitars, the Les Paul or Tune-o-matic style bridge is pretty easy to change strings. Let’s get started.
- Removing the old strings: First, we need to remove the old strings. I usually just down tune the strings until they are floppy. When you are dropping the string tension, pay close attention to the bridge. Most Les Paul tailpieces are not physically attached to the bridge. They are just held in place by the string tension. After the tension is gone, the tailpiece will fall right out.
- Clean the Fretboard: You can use any number of special fretboard cleaning products to clean your fretboard, but I like to use Murphy’s Oil Soap. Oil soap not only helps clean your fretboard, it also helps condition and moisturize it. Since your fretboard is unfinished, there is no layer of lacquer to help protect it from the elements. The fretboard can dry out and crack if it is severely dried out. Oil soap will prevent your fretboard from drying out. It will also give your fretboard a new clean shine.
- Restringing your Les Paul: First, line up all of the tuning postholes, so the holes are open toward the nut. This way the string can go straight through the tuning post. Wrap the string around the post approximately three times. This keeps the string from slipping when the guitar is tuned. Now bend the string in a 90-degree angle. This bend will help keep the string from pulling out of the tuner while you are tightening the tension.
- Stretching the strings: Whenever you change the strings on your guitar, it is important to stretch the new strings. Stretching your strings will help keep them in tune better later on. It’s important to do this to all the strings. Stretching the string will initially make your guitar go out of tune, so you’ll have to retune it one more time.
Next, pull up on the string to maintain tension on it while you are turning the tuning button with your string winder.
Make sure each new wrap of the string is below or underneath the previous wrap. Wrapping the strings like this prevents the strings from slipping when you bring it up to pitch.
The tapered tuning post squeezes the string in the post’s hole by forcing the wrapped strings toward the center of the post. Use this process for each string.
Now your Les Paul is all set to play. Plug it into your amp and crank it up!
Classic Fender Bridge
Fender Stratocaster® style guitars usually have a tremolo bridge. This feature makes restringing a Fender slightly different.
The strings are inserted through the back of the guitar through the tremolo bridge.
If you have trouble lining up the strings with the holes of the bridge, remove the faceplate on the back of the guitar.
On most guitars the tuning pegs have a hole in the center for the string to be inserted into.
The string will need to be cut before inserting it into the tuning peg, so there is not too much extra string to work with.
Hold the string in place and slightly tight against neck. Cut the string about 2-3 tuning pegs above the tuning peg for the string you’re putting on.
This will give the string enough length to be wound around the tuning peg.
Insert the cut string into the hole in the center of the tuning peg and bend the string at a 90 degree angle in the tuning peg.
Begin winding the string so the string wraps around the tuning peg counter-clockwise.
Repeat the steps for each string.
Tune up the guitar. New strings will adjust and settle more after you tune up and start playing.
Stretch the strings by gently pulling them upward from the fretboard and pushing the string down at different frets with your other hand.
Floyd Rose Bridge

Guitars fitted with a Floyd Rose mechanism will have a slightly different process for restringing.
Step 1
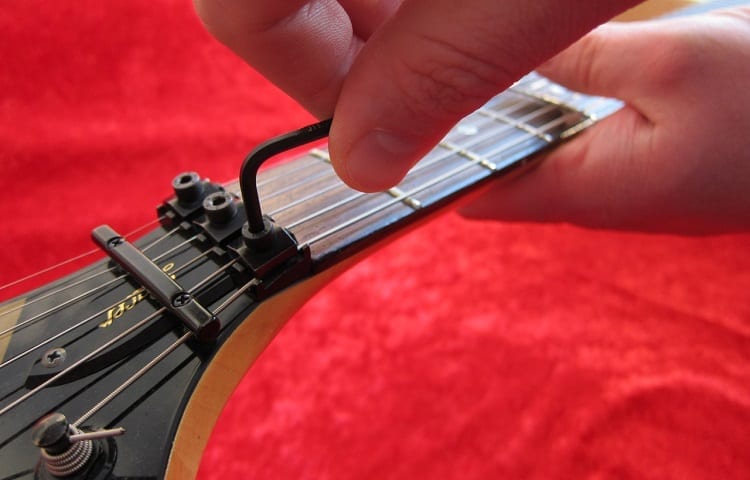
Remove the string clamp from the locking nut. Use the 3mm hex wrench, provided with your guitar, to loosen the low E and A string clamps.
Unwind the low E string from its tuning post first. The process we use for the E string will be used for each of the other strings.
Unlike with other guitars you won’t remove all your strings. Replacing one string at a time with a Floyd Rose bridge is necessary.
Replacing one string at a time maintains consistent string tension so that you don’t have to re-balance your bridge.
Step 2
Remove the string from the bridge. Use your 3mm wrench to loosen the string lock screw that pushes the saddle block tight against the string.
Before installing the new string, use your string cutter to remove the ball end of the string.
Step 3
Install the new string. Insert the cut end of the string into the saddle directly in front of the saddle block. Use your 3mm hex wrench to secure the string in the saddle.
Hand tighten it first and then use the wrench to snug it up. Cranking too hard can strip the screw, so be careful!
Slide the string through the tuning post at the headstock and leave a little slack.
Even with a locking nut, your windings should still descend the post without overlapping for maximum tuning stability.
Step 4
Stretch your strings! With a Floyd Rose, stretching your strings is crucial. Stretch your string across the entire length of the fretboard and then re-tune.
Continue re-tuning and stretching until the pitch stabilizes. Stretching once will not be enough.
If your strings are properly stretched, your bridge will return to the proper tilt and pitch when the whammy bar is not in use.
The locking nut mechanism that we removed in step one stabilizes both the E and A string, so before we move on, repeat steps 1-4 for the A string.
Step 5
Fine-tuning. Time to play is almost here, but first you’ll want to dial in the pitch of your instrument.
Set the fine-tuner so that about two-thirds of the threads are showing, then tighten your locking nut at the headstock. This will give plenty of play in the string.
Pro Tip: Once the locking nut is tightened, don’t use the headstock tuners or you could break your strings.
The steps above apply to all of the remaining strings so repeat the process until your new strings are all tuned up and you’re ready to rock!
Signs that new strings are needed
If playing the guitar is nothing new to you and you’ve already gained significant experience in this field, it might not be difficult to tell when it’s time to change your strings.

However, if this is your first guitar, there are some signs will let you know when it’s time for new strings.
One of the first and easiest things to notice is that keeping your instrument in tune becomes more challenging.
Not to mention that staying in tune might be just a matter of minutes before you need to get the instrument in tune again. Even after tuning your guitar, the tone produced might sound wrong.
The way the strings look will also tell you if it is time to invest in new strings.
If they are discolored and rusty or the wraps have come unwound, exposing the core, it’s crystal clear that they won’t be of much use anymore.
If you’ve noticed any or all of these signs, heading to a music store for new strings is the thing to do.
Choosing the right ones for your guitar is crucial, though, and we’ll cover this topic below.
How often should you change your electric guitar strings?
The answer to this question varies from one player to another, yet there are some key things to consider to understanding the timing that is best for you.
One of the first things to take into account regarding the frequency of your practice sessions or gigs.
If you play more frequently than just once in a while, or you take this instrument seriously, chances are good that you will need to change the strings more often than amateur players.
Also, if you change tunings quite often, the strings might become useless sooner.
Plus, think of the environments you play in.
Is there a lot of smoke or do you smoke while playing?
Weather elements and smoke might shorten the life of your electric guitar strings.
Additionally, if you sweat a lot and your perspiration gets on the strings, they can fail quicker and require replacement sooner.
Finally, your playing style counts a lot when it comes to how long your strings last.
If you often adopt a more aggressive style and there’s a lot of hard picking and bending involved, be ready to change the strings more often.
The quality of the strings you use plays a lot into the durability of your strings, even when many of the factors mentioned above are involved.
That’s why it is best to invest in premium-grade strings that will cover your needs for a longer time if you play frequently.
Guitar string maintenance tips

The way you take care of your strings is also an important factor as far as their lives are concerned.
With a few simple tips, you can prolong the life of your electric guitar strings, and in turn, replace them less frequently.
Make sure you wipe down the strings with a clean cloth after every practice session or gig.
Dust, perspiration, or other elements on the surface of the string can shorten their life.
If playing the guitar is not just a spare time activity, you might want to consider getting cleaning tools that were specifically designed for strings.
It is best to wash your hands before your practice session or gig in order to prevent string oxidation.
The oils from your hands, the food you suck down before your gig, and even lotions or fragrances can stick to your strings. This will make them sticky and less springy.
Even if you follow these tips, other factors might damage a string.
To avoid unpleasant events, make sure your gear and maintenance kit includes some extra single strings or even an extra set.
If a string breaks, you can change it immediately, and keep playing without delay.
Light gauge strings are preferred by some musicians, but they tend to break more easily.
If you prefer light gauge strings, make sure you buy in bulk, so you don’t have to constantly run to the music store for backups.
Many factors affect the durability of the strings you use and thus how often you need to change them.
The quality of the materials employed, the way you play, and how much and often you clean them, all have a word to say as far as string life is regarded.