To be a musician, you need to learn some music theory and how to play an instrument, of course. But rarely do we expect that in order to enhance our craft, we need to learn our way around computers. However, this is exactly what you will need to do if you want to record your own covers or songs.
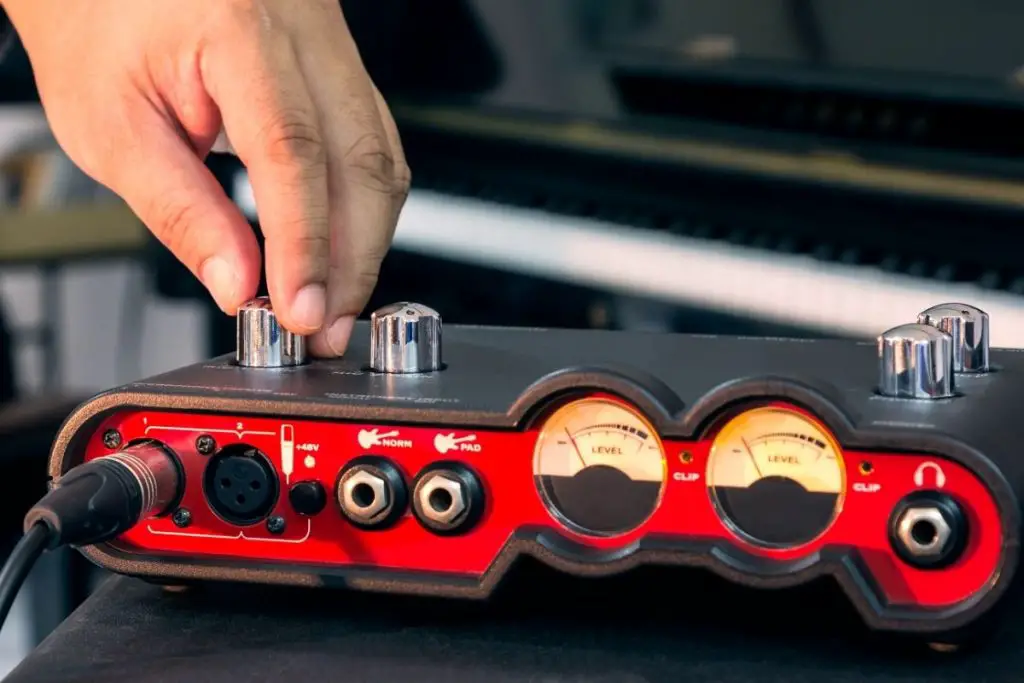
In order to make good quality home studio recordings, you’re going to have to use an audio interface. An audio interface is an external sound card with inputs for instruments and mics.
If you’ve got your first audio interface and aren’t able to figure out what’s happening, in this article, we will explain the basics and how to set up an audio interface for your home recording studio.

What Is an Audio Interface?
To put it in simple terms, an audio interface is a thing you need to get sound in and out of your computer. You will need an audio interface if you want to make a high-quality recording of an instrument or your voice, as well as master and mix your recordings.
The job of the audio interface is to take audio signals from a direct input such as a keyboard, bass, or a guitar and convert them into a digital signal that your device will be able to understand.
Basic recordings can be made using any modern tablet, computer, or laptop since almost every device comes with a built-in sound card. The sound of the recording can also be improved on tablets and phones to some degree by using a better microphone. However, you will definitely need an audio interface if you want to make a professional recording.
Are an Audio Interface and a Sound Card the Same Thing?
An audio interface and a sound card basically do the same job. They get sound in and out of your tablet, pc, and laptop so that you can edit it. Essentially, an audio interface is an external sound card that’s great for tablets and laptops. Nowadays, people with desktop computers also use an audio interface.
There’s no longer a need to fit a whole sound card inside your machine in order to improve the quality of your recordings. Even though you probably can already record with your computer, laptop, or tablet, you will definitely sound more professional when you buy an audio interface.
Input Types
Most audio interfaces will offer you a wide range of input types that you will be able to connect to whatever type of equipment you like. However, you need to make sure that your audio interface has everything you need, which is why we’re going to go over the most important things.
- Instrument Inputs – You won’t need a direct box to connect basses and guitars directly to your audio interface, thanks to instrument inputs.
- ¼ TRS Line Inputs – Tip-Ring-Sleeve, or TRS, line inputs are balanced connections used for line-level devices like outboard processors, synthesizers, external channel strips, and microphone preamps.
- Microphone Preamps – When it comes to microphone preamps, they usually use XLR input connectors. Typically, they will accept both condenser and dynamic microphones. Some XLR inputs are switchable between line-level signals and mics. If this is the situation and you want to connect a line-level source, you won’t need a direct box to do it. The chances of you needing to invest in an external preamp are smaller when the quality of your microphone preamp is higher.

How to Setup Audio Interface
If you understand the basics of cabling, you’re good to go for the first part of setting up your audio interface. A power adaptor or power cable will be packaged with your interface, and they will need to be plugged into your power conditioner or the wall before you can turn the thing on.
Depending on what type of audio interface you bought, it will also come with one of three cables you will need to connect to your computer. You will either get a USB cable, thunderbolt cable, or a firewire cable.
Before the audio interface can interact with the computer, you will need to plug this cable in. Nowadays, most audio interfaces come with a USB cable. You can connect the cable as long as you have a USB adapter (in the case of a tablet) or a USB port; however, make sure that it is compatible by checking the hardware specs.
Even though USB audio interfaces are the most widespread ones, you can also get firewire and thunderbolt audio interfaces. Firewire and thunderbolt are usually pricier, but the reason for this is that they have the benefit of being faster.
Connecting An Audio Interface
Even with the advanced technology of today, you will hardly be able to plug your audio interface into your computer and have this result in outputting music automatically.
For this reason, you will need to choose your audio interface in your operating system. To do this, the audio settings for your operating system will need to be found.
Luckily, in most situations, connecting your audio interface to a laptop or PC is fairly simple. After you’ve connected the audio interface to your USB/thunderbolt/firewire input, you will need to go through the following steps:
- Make sure that power is received by the audio interface. Oftentimes, this is indicated by a light.
- Unless you plan on using a condenser microphone, check that phantom power is not turned on.
- The gain setting should be turned down to the bottom.
- Make sure that your computer recognizes the audio interface through the digital audio workstation (DAW) or audio input and output settings.
- Connect your microphone or instrument to the inputs of the interface, and you can do this by using an XLR or a jack cable.
- Gradually increase the gain on the model in order to check that the input signal is coming through. A green light should indicate this, and it will show up as you speak or sing into the microphone or play the instrument.
- Set the audio to a level that is clear and is not clipping or peaking.
- You should be ready to record once you set the input in your digital audio workstation to the audio interface.
There are a few other things that you should keep in mind. You might want to see if you need to install a drive in case your audio interface isn’t recognized by your DAW or computer automatically.
Even though many audio interfaces do not need a driver, while others install the driver automatically, there are still audio interfaces that might need a manual installation of a driver.
FAQs About Setting Up Audio Interfaces
Does an Audio Interface Improve Sound Quality for Recording?
One of the main uses of an audio interface is improving and facilitating recording instruments. Since this is the main reason for their creation, even audio interfaces that are cheaper manage to do a good job too.
The alternative to using an interface is to use the soundcard in your smartphone, tablet, laptop, or computer, and this comes with some disadvantages, such as a lot of hisses or white noise in the recording.
How Many Inputs/Outputs Do You Need?
If you’re thinking about how many inputs/outputs to look for, a good rule to stick to is to go for more inputs/outputs than what you think you need. This way, you won’t be putting a limit on yourself from the very start.
What Type of Audio Interface Should I Buy?
In order to answer this question properly, you will first need to think about what kind of producer you are and what you aspire to be. We recommend creating a list that consists of two parts.
In the first part, write down what your needs at the moment are, and in the second part, write down what your goals are for the future. Once you have your list, you can easily get rid of any options that don’t fit what you’ve written down.
Final Thoughts
In the past, you needed to go to a recording studio to get a high-quality recording, but nowadays, you can do it effortlessly with an audio interface.
People who play instruments and do podcasts love the fact that they can record anything they want. However, if you’re new to it, it can be a bit confusing when it comes to connecting an audio interface to a computer.
We hope that the tips we provided in this article helped you learn how to setup an audio interface, and that you start making amazing recordings in no time!


